Bursts and stacks
Palomino groups near-duplicate frames automatically and gives you tools to resolve them fast.
How bursts are grouped
Palomino looks at each photo's content in the background and groups consecutive frames that look nearly identical and were shot close together in time. Frames are grouped while each one was shot within about five seconds of the frame before it. Frames fired in rapid succession, within half a second of each other, are grouped by that timing alone, so a fast wildlife or sports burst holds together even when a small subject keeps the frames from looking alike. This happens at background priority so it never delays culling.
Burst photos show a stack badge on their thumbnails with the frame's position and the group size (for example, "2/3"). In the Bursts filter, every cluster appears grouped naturally because burst frames are consecutive files.
The grouping is based on visual similarity plus timing, not camera burst mode detection. A sequence of similar frames shot manually can also form a group.
Seeing where one group ends and the next begins
The filmstrip separates adjacent burst groups with a slightly wider gap, so groups read as clusters the way frames do on a contact sheet. The wider gap also sets a solo frame apart from the group before it. When bursts are collapsed to single frames, the strip keeps its normal even spacing, since the count badge already marks each group.
The grid marks the first frame of each group with a thin blue line on the cell's left edge.
Working a burst
The fastest workflow for a burst:
- Move to the burst group. The thumbnail badge shows you're inside one.
- Look through the frames with the arrow keys.
- Pick the best frame with P.
- Press ⌘⇧X to reject all other members of the group in one step.
⌘⇧X (Reject Others in Burst) rejects every photo in the current burst group except the one you're on. It does not affect photos outside the group.
The Bursts filter chip in the filter bar shows how many distinct groups were found. Click it to restrict navigation to burst members only, useful for a quick sweep after your initial pass.
The best frames in a burst
Palomino marks the best frames in each burst with a small crown in the cell's footer strip below the thumbnail. It always crowns the best frame in the group, which Palomino judges by sharpness measured from the photo while it loads in the background. In a longer burst it can also crown up to four more frames, when they capture a visibly different moment from the best frame or come close enough in quality to be nearly indistinguishable from it. Hold the pointer over a crown to read "This frame is one of the best in its burst."
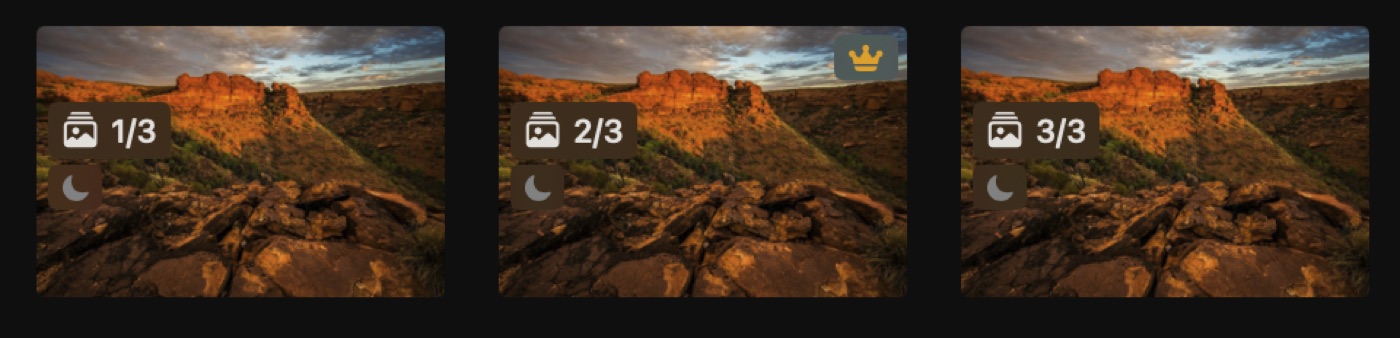
Short bursts of eight frames or fewer always show a single crown, so a quick sequence works the same way it always has. A frame where Palomino detects closed eyes ranks lower in the comparison, though it can still earn a crown if it remains among the best frames in the group.
Reading a burst in rank order
The filmstrip shows each burst in shooting order. To read a burst with its best frame first, click the rank order button at the trailing end of the filmstrip's head bar, or press R. Each burst then lays out its frames in the rank order Palomino measured, best first, while bursts keep their place among the other photos and the folder sort stays as it was. Frames that did not compete for the crown, such as a frame with no located eye in a burst measured at the eye, follow the ranked frames in shooting order. The arrow keys step through the strip in the order shown, and with Collapse Bursts on, a collapsed burst shows its rank 1 frame. Press R again to return to shooting order.
The button stays dimmed while analysis is still running, because ranks can change until it finishes. Rank order is a view setting: it turns off when you reopen Palomino, and it leaves the sort order, the session file, and every rating as they are.
How Palomino measures sharpness in a burst
When Palomino locates the subject's eye across a burst, it measures sharpness at the eye instead of across the whole frame. This matters when autofocus lands on a branch in front of a bird or a rock beside an animal, because the frame that reads sharpest overall can be the one that missed the eye.
Palomino chooses one measurement for a whole burst, so every frame in it is compared on the same terms. It also binds to a single subject for the length of the burst, which keeps the crown on the same animal when a second one is in the shot. A frame where no eye is found sits out the comparison. If that happens on more than a third of the burst, Palomino measures the whole group by overall sharpness instead, so a frame where the subject turned its head still gets judged fairly.
Palomino locates eyes on people and on many animals, including dogs, cats, foxes, and deer. Birds and insects have no eye model available on macOS today, and a burst with no detectable subject, such as a landscape sequence, is crowned by overall sharpness exactly as before.
The crown is a suggestion to speed up your first pass. Your own pick and star ratings always stand, so you can keep a different frame and the crowns stay where Palomino placed them.
A crown appears once a burst has at least two frames still in the folder and Palomino has measured at least one of them. On a large import the crowns may take a moment to show while that analysis runs. If you reject and remove members until a single frame is left, that frame shows no crown.
Seeing why a frame was crowned
Click a crown to see a short popover explaining the rank in plain language, for example "Sharpest of 12 frames, measured at the eye. Both eyes open."
The info panel's Score section shows the same explanation with more room: the frame's rank among the others in its burst (for example "2 of 12"), a bar for Palomino's on-device aesthetics score, and the reason sentence. Press I to open the info panel if it is hidden. See Viewing and Filtering for what else the panel shows.
The rank, the aesthetics score, and the reason sentence are all read-only. Nothing here changes which frame gets the crown: the crown is decided first, by the measurements described above, and the Score section only explains that decision after the fact.
When Palomino has worked out, or you have set, the folder's genre, the reason sentence leads with the criteria that matter most for that kind of shoot: the eyes for a wedding, sharpness and the subject for wildlife or sports, focus and stacking for macro, light and exposure for landscape. See Viewing and Filtering for the genre chip and its popover.
AI-written reasons
On a Mac that can run Apple's on-device model, Palomino writes the reason sentence itself instead of assembling it from a fixed set of phrases. The wording reads more naturally and can mention more than one thing about a frame at once. It runs entirely on your Mac, and your photographs are never uploaded.
The sentence is checked before you see it. Palomino asks the model which measurements it used, and discards any sentence that refers to something the photo does not actually carry. When that happens, or when the model is unavailable, you get the measured wording instead. The rank and the crown never change either way.
Model-written reasons are part of Pro, with one exception: crowned frames get one for everyone, so you can see what the feature does on your own photographs. Every other frame gets the measured wording, with a link under it to upgrade.
On macOS 27, Palomino also shows the model the photograph itself, downsampled, so the reason can mention things no measurement captures: motion blur on a wing, a distracting highlight, rain on the lens. Those appear under their own heading, "Noticed in the photo", so you can always tell what Palomino measured apart from what the model saw. The photograph is passed to the model on your own Mac and is never uploaded. On earlier versions of macOS the sentence is written from the measurements alone.
Turn the feature off in Settings under Reasons if you prefer the measured wording everywhere. On a Mac without the on-device model, the setting is switched off and explains why.
Focus stacks
A focus stack is a burst where the photographer racked focus across the scene, producing a run of frames that are each sharp in a different part of the image rather than one shot with a single focus point. Photographers combine these frames afterward in a tool built for the job, such as Helicon Focus or Adobe Lightroom Classic, which merge the sharp regions from every frame into one image with everything in focus. Phocus for Mac does not merge focus stacks, so a stack bound for Phocus still needs Helicon Focus or Lightroom Classic for that step.
Palomino treats a focus stack differently from an ordinary burst. It does not crown a best frame within a stack, since every frame earns its place by being sharp somewhere the others are not. The reject-others workflow does not apply to a stack either, since a merge needs every frame in the run rather than one winner.
Detecting a focus stack
Palomino reads focus-bracket sequences directly from Hasselblad X2D II files and labels them as stacks automatically. This works even on a bracket where the camera's regular focus-distance reading stays the same across every frame, because the camera also records that the sequence was shot with focus bracketing.
For other cameras, Palomino looks at the focus distance recorded with each frame and checks whether it moves steadily across the burst, the way it would during a manual focus rack. A sensitivity slider under Stack detection in Settings (⌘,) controls how readily this check labels a burst as a stack. Detection can also be turned off entirely from the same section, which stops Palomino from labeling new stacks on its own without affecting any stack you have already marked by hand.
Marking a stack by hand
Any run of frames can be marked as a stack, whether or not Palomino's own detection recognized it as one, which covers cameras Palomino cannot read a focus signal from at all. Select the frames in the grid or filmstrip, or stand on a single frame already inside a burst, then choose Mark as Focus Stack from the Photo menu.
To turn a stack back into a regular burst, select it and choose Mark as Regular Burst from the Photo menu. A manual choice always stands: Palomino's automatic detection never overrides a group you marked by hand.
Keep all in stack
Press ⌘⇧K, or choose Keep All in Stack from the Photo menu, to pick every frame in the current stack in one step. A merge tool needs the whole run, so this is the stack equivalent of picking a favorite from a regular burst and rejecting the rest.
Stacks in the filter bar and on thumbnails
A stack carries its own badge on its thumbnail, showing the frame's position and the stack size such as "2/5," with a different icon from the burst badge so the two are easy to tell apart. Once your shoot contains at least one stack, a Stacks filter chip appears next to Bursts in the filter bar. Click it to restrict navigation to stack members, the same way the Bursts chip does for ordinary bursts.
Copying a stack
Turn on Keep stacks complete in the Copy to Folder sheet to copy every frame of a stack whenever any one of its photos matches your filter. This keeps the whole run together for your merge tool even if you only picked one frame from the stack. The toggle is on by default and appears only once your shoot contains at least one stack. See Copying Your Selects.
Collapsing bursts
When a shoot has many bursts, you can collapse each burst to a single thumbnail so the filmstrip and grid show one frame per burst instead of every frame. Open the View menu and choose Collapse Bursts. The same menu item then reads Expand Bursts, which turns the behavior back off. Collapsing starts off when you open a folder, so the full set shows until you turn it on.
A collapsed burst shows one representative thumbnail with a stack badge and the frame count, for example a stack icon next to "3." The representative is the burst's best crowned frame when that frame is present and matches the active filter, otherwise the first frame of the group. With rank order on, it is the best-ranked frame the strip can show.
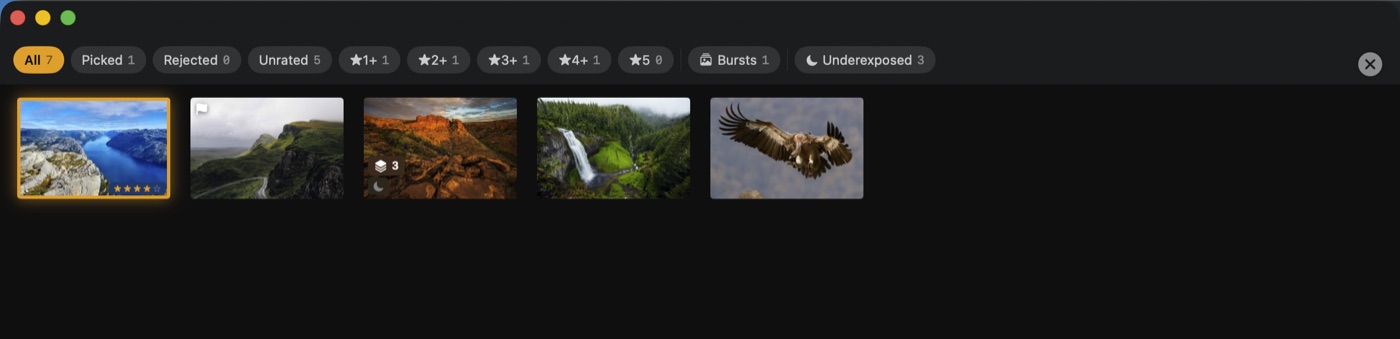
To open a single burst, click its representative thumbnail. The burst expands in place and the frames around it stay where they are. To collapse it again, click the chevron badge on the representative, or right-click the frame and choose Collapse burst.
While Collapse Bursts is on, the arrow keys also work: press the down arrow to open the selected burst, and press the up arrow to collapse it again.
Compare view
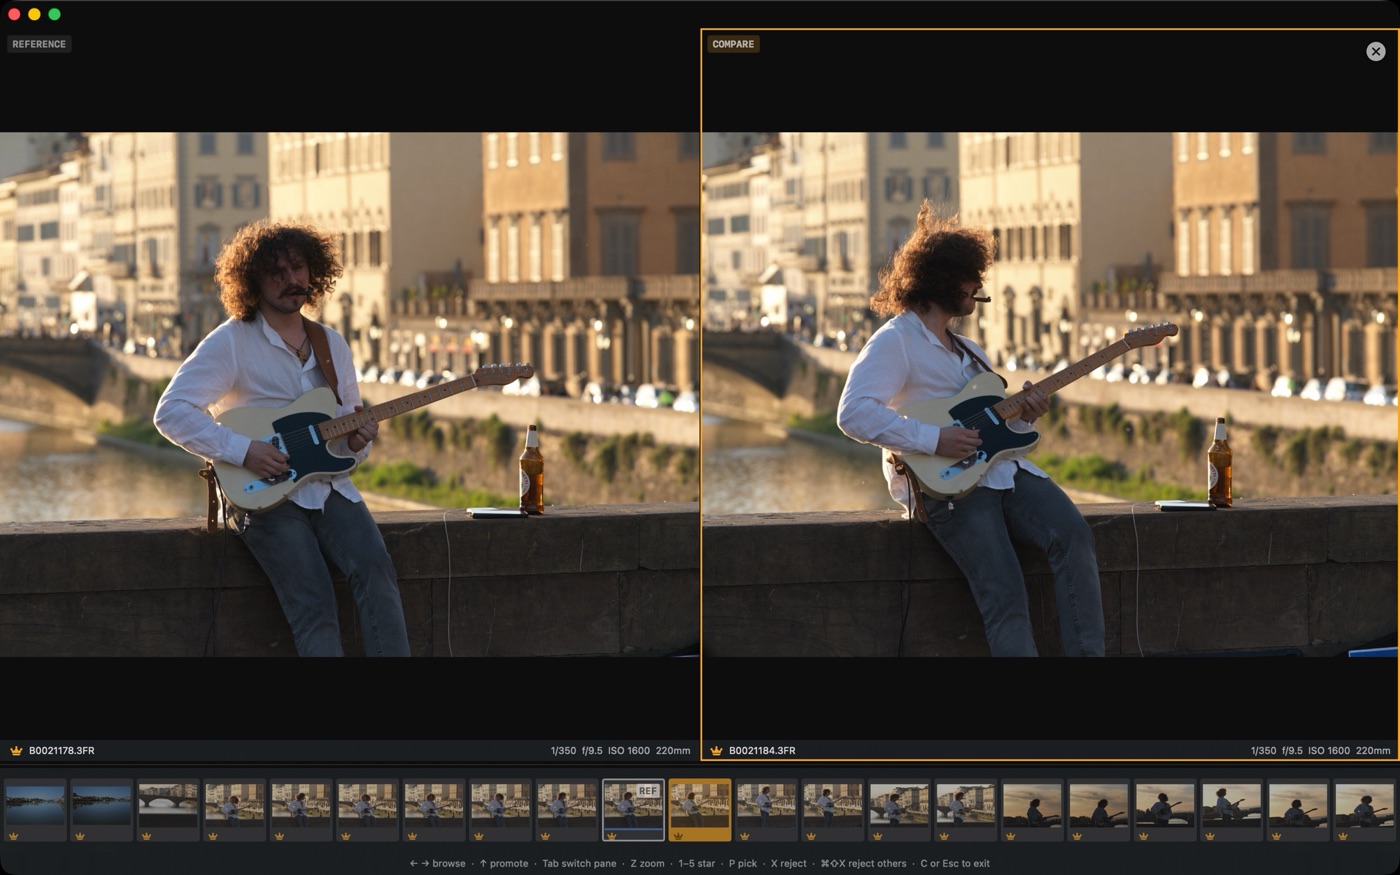
Press C to open the compare view. Two photos appear side by side: the current photo on the left (the reference pane) and another photo on the right (the compare pane).
Choosing the pair
You can choose the pair yourself. In the grid, select exactly two photos and press C, and those two open in the compare view directly, wherever they sit in the shoot. This is the fast way to settle a choice between two frames that are not burst neighbors.
Stepping and promoting
Leave the best candidate in the left (reference) photo. Use the left and right arrow keys to step through the other frames on the right, comparing each against your reference. The arrow keys step through the current filtered set, in compare exactly as in the single view. While the right pane shows a frame from the reference's burst, its label reads BURST n/m; once you step past the burst it reads COMPARE, so the boundary stays visible.
Press the up arrow when the right pane wins a comparison. The winning photo becomes the new reference and the next photo loads on the right, so you keep testing the rest of the shoot against your best frame so far. After a promote, closing the compare view lands you on the winning photo.
A promote on the last photo of the set works differently, because there is no next photo to load. The winner still becomes the reference, and the right pane keeps showing it, so both panes hold the same frame. The active-pane border also stays where it was, since no navigation happened; both panes show the winner, so the rating and flag keys act on it from either pane. This marks the end of the run: closing the compare view lands you on the winning photo.
Zoom in compare
Zoom works inside compare, and by default both panes zoom and pan together. Press Z to zoom to 300%, centered on the reference photo's sharpest eyes when Palomino has found them, V to zoom to the largest face, and = or - to step the zoom. Scroll or drag inside a pane to move around while zoomed. The link button at the top of the compare view switches the panes to independent movement, and the match button then lines the compare pane back up with the reference pane.
The zoom keys always act on the reference pane: with the panes linked, the compare pane follows along, and with the panes unlinked, Z, V, =, and - change the reference pane alone. To zoom or move the unlinked compare pane, scroll or drag inside it, or click the match button to line it up with the reference again. Zoom uses the same preview both panes already show, so it stays fast.
What each pane shows
Each pane's bottom strip shows the photo's capture settings next to the filename: shutter speed, aperture, ISO, and focal length. Fields a file does not carry stay blank. The strip also carries the photo's cull state: the pick or reject flag, the crown on a group's best frames, the star rating, and the color label.
The focus mask (⌘F) works here too, and each pane shows its own mask. Deciding between two near-identical frames is where the mask helps most: step through the burst and keep the frame where the overlay sits on the subject. The overlay color you picked in the single view applies here too. See Viewing and Filtering.
Which pane the keys act on
The rating and flag keys act on the active pane, marked by a highlighted border. The right (compare) pane is active when the view opens, so the keys work on the photo you are stepping through, as they always have. Press Tab or click a pane to make the other pane active, for example to rate the reference itself, then rate or flag it in place. Acting on the reference pane never moves the right pane forward. Every arrow step makes the right pane active again, so the photo that just arrived is always the one the keys act on.
Press C or Esc to close the compare view and return to the single-photo preview.
Compare stepped past my burst group. The arrow keys walk the whole filtered set, so from the last frame of a burst the next press moves into the rest of the shoot. The right pane's label marks the boundary: it reads BURST n/m inside the group and COMPARE beyond it. To keep navigation inside bursts, click the Bursts filter chip, or select exactly two photos in the grid and press C to pin compare to that pair.