Copying your selects
Copy to Folder copies your selected photos to a destination folder. Your originals stay in place: nothing is moved or deleted unless you explicitly turn on the trash option.
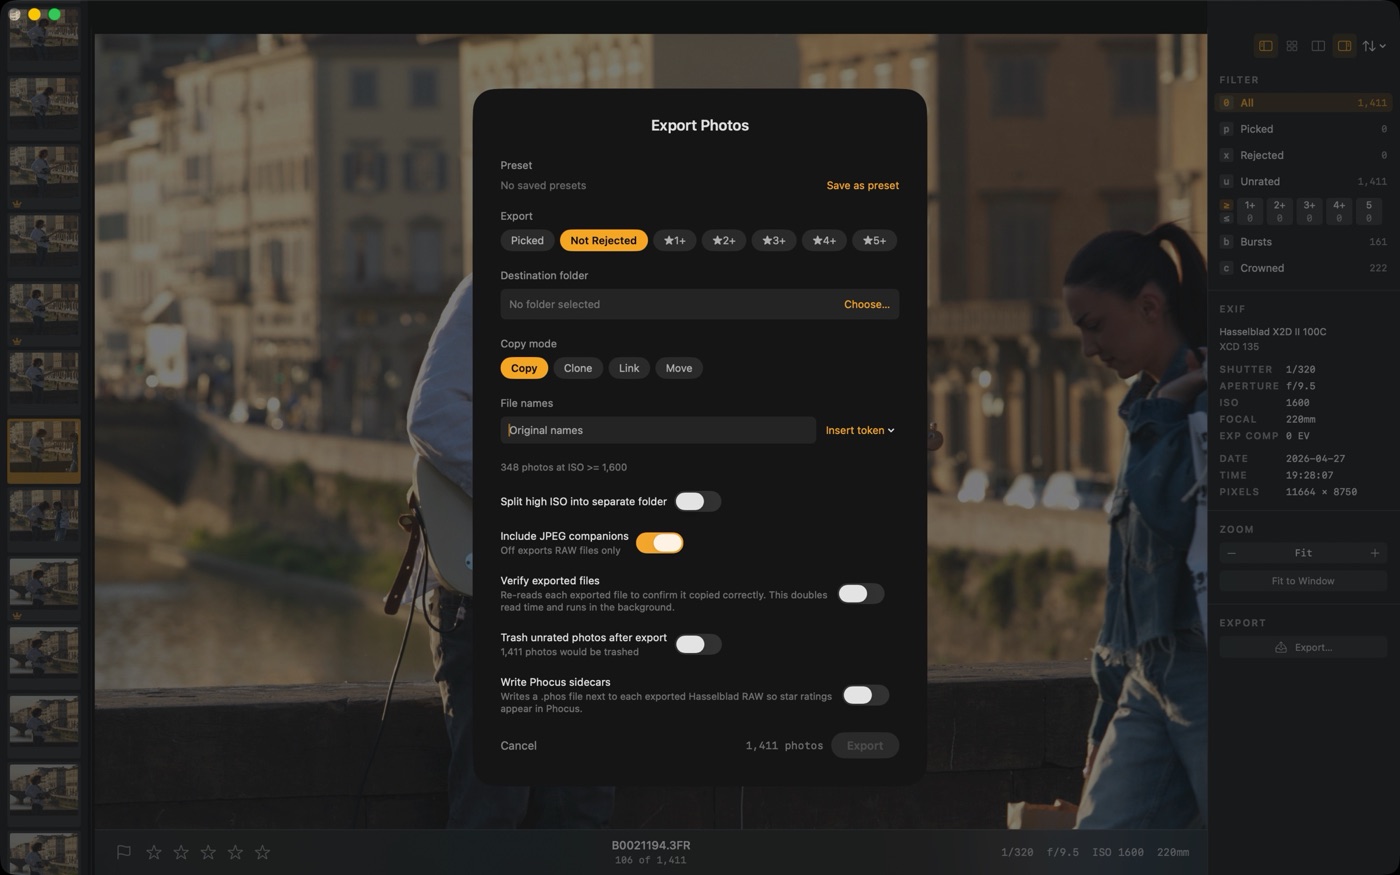
The Copy to Folder sheet step by step
- Press E to open the Copy to Folder sheet. You can also open it from the File menu or the Copy to Folder button at the bottom of the info panel.
- Choose what to copy using the filter chips at the top: Picked, Not Rejected, or a minimum star rating (★1 through ★5). Not Rejected works well for reject-first workflows where you reject what you don't want rather than actively picking keepers.
- Click Choose… next to Destination folder and pick where the copies should go.
- Choose a copy mode if you want something other than a regular copy. See Copy modes below.
- Review the photo count next to the Copy button, which reflects your current filter selection.
- Click Copy (or Move, if you selected Move as the copy mode). The sheet closes and the copy runs in the background, so you can keep culling while it works. When the copy finishes, a completion card appears in the bottom-right corner with an Open in Finder button that takes you to the destination, and a Done button to dismiss it.
Copy modes: Copy, Clone, Link, and Move
The Copy mode row in the sheet chooses how each photo reaches the destination.
- Copy duplicates each file. It is the default and works everywhere.
- Clone makes a space-free duplicate on the same drive, so a second copy of a full shoot costs no disk space. It needs the destination on the same drive as the source, and it is off while Verify copied files is on.
- Link creates a hard link instead of copying bytes, so both names point at the same file on disk. The same-drive and Verify limits that apply to Clone apply to Link as well.
- Move copies each photo, verifies the copy, and then puts the originals in the Trash. Verification is always on for a move, and a photo's originals are trashed only after every one of its copies passes, so a failed copy keeps that photo's source files in place. The originals go to the macOS Trash rather than being deleted outright, so a move you regret is recoverable. Move works across drives, and the first time you select it Palomino explains what it does and asks you to confirm. The completion card reads "Moved" instead of "Copied" when the move finishes.
A move always brings each photo's sidecars along, even when the sidecar settings are off, because leaving a sidecar next to a photo that moved away would orphan it. When the source is a camera card, only Copy is available, because files on a card are never changed.
A camera card cannot be a destination either. If you pick a folder on a card as the destination or the High ISO folder, the sheet says "Palomino doesn't write to camera cards" and the Copy button stays off until you choose a folder on a regular drive.
Copies run in the background
The Copy to Folder sheet closes the moment you start the copy, and you stay on the photo you were judging. Progress shows in the "Background work" panel that appears over the main window. You can keep rating, open a different folder, or start another copy while the first one is still running.
If you start a second copy before the first finishes, it joins a queue and runs after the current one. Copies run one at a time so they do not compete for the disk. The completion card shows how many more copies are still queued.
When a copy finishes, the completion card stays on screen until you dismiss it with Done, so a finished copy never interrupts your culling. Use Open in Finder on the card to jump to the destination folder. If you split high-ISO frames into a separate folder, the card also offers Open High ISO in Finder.
When any file fails to copy, a separate card titled "Copy failed" lists the affected files. It stays on screen, including across queued copies, until you click Dismiss, so a failure that happens while you are heads-down culling is still waiting for you when you look up.
Verifying your copy
Turn on Verify copied files in the Copy to Folder sheet to have Palomino confirm each copy is intact. It is off by default (Move turns it on automatically; see Copy modes above). With it on, Palomino re-reads every copied file after the copy lands and compares it to what it wrote. Each file is read a second time, so the copy takes longer, and the check runs in the background while you keep culling.
The first time you turn verification on, Palomino explains what the check does and asks you to confirm. The completion card reports how many files were verified. When any file fails the check, a card titled "Files failed verification" lists the affected files and stays on screen until you dismiss it. Verification confirms the delivered copy matches what Palomino read. It does not re-check the original file on your card.
What gets copied
Copying follows your active filters. The rating or flag chips in the Copy to Folder sheet decide which photos qualify, and any capture-day filter you set while culling narrows the set to that day. If you have filtered to one day, copying offers only that day's photos. Clear the day filter to copy the full shoot. The photo count next to the Copy button always reflects what will actually be copied.
Naming copied files
Copy to Folder can rename each copy from a template you build in the sheet, so a delivery folder reads as a client job. The File names field sits under the destination folder. Leave it empty and the copies keep their original names, which is the default.
Type a template in the field, or use the Insert token menu to add tokens one at a time. A token is a name in square brackets that Palomino replaces for each photo, so [Job]_[YYYYMMDD]_[####] renders as SmithWedding_20260614_0001. Once the field has a template, a Job field, a Start number field, and a greyed Example line appear, and the example shows the exact name the first matching photo will get as you type. Any text that is not a token comes through as written, so separators like _ and - stay in the name. Tokens are case-sensitive, so [MM] is the month and [mm] is the minute. When a photo has no value for a token, for example a lens that recorded no name, that part of the name is left empty.
| Token | Renders as |
|---|---|
[Job] | The job name you type in the Job field |
[Original] | The original file's name, without its extension |
[####] | A zero-padded sequence number; the width follows the number of # characters, so [####] gives 0001 |
[YYYY] | Capture year, for example 2026 |
[MM] | Capture month, for example 06 |
[DD] | Capture day, for example 14 |
[YYYYMMDD] | Capture date shorthand, for example 20260614 |
[HH] | Capture hour, 24-hour clock, for example 14 |
[mm] | Capture minute, for example 32 |
[ss] | Capture second, for example 07 |
[HHmmss] | Capture time shorthand, for example 143207 |
[Camera] | Camera body name |
[Lens] | Lens name |
[ISO] | ISO value |
[Aperture] | Aperture (f-stop) |
[Shutter] | Shutter speed |
[Focal] | Focal length |
[ExpComp] | Exposure compensation |
[Pixels] | Pixel dimensions |
The Job field fills the [Job] token and changes per gig while the template shape stays the same. The Start number field sets where the sequence begins, and it defaults to 1. Raise it to continue numbering across two cards of one job, so the second copy picks up where the first ended rather than restarting at 0001 and colliding in the folder. The sequence is assigned once across the whole copy in your current sort order, so a high-ISO split still numbers as one shoot: the separate high-ISO folder shows the gaps where those frames landed.
The rendered name drives the RAW, its JPEG companion, the .xmp sidecar, and any Phocus .phos sidecar together, so a renamed file and its sidecars stay one matched set on import into Lightroom, Capture One, or Phocus. When a template would give every photo the same name, for example one with no sequence, date, or time token, the sheet warns you before the files collide into numbered suffixes.
When a file already exists
The If a file already exists row in the Copy to Folder sheet decides what happens when the destination folder already holds a file with the same name as a photo being copied. A RAW and its JPEG companion count as one photo here, so the choice applies to both files together.
Keep both is the default. The new copy gets a numbered suffix, so IMG_0001.3FR lands as IMG_0001_1.3FR and the existing file stays as it was.
Skip leaves the photo out. The existing file stays as it was, nothing is copied for that photo, and the completion card reports how many photos were skipped. Under Move, a skipped photo stays in the source folder.
Replace overwrites the existing file and its .xmp sidecar with the new copy. Palomino asks you to confirm before the copy starts, and the choice resets to Keep both the next time you open the sheet. Each file is written next to the old one first and swapped in only after it has landed, so a copy that fails partway leaves the old file in place. A Phocus .phos sidecar that Phocus has expanded with edits is kept, so check it if the replaced file is a different photo that happens to share the name. Replace is off while Move is selected.
Presets remember this choice.
Skipping photos you already copied
Palomino records when a photo is copied to a folder and keeps that record with the session, so it survives closing the folder or re-inserting the card. Turn on Skip photos already copied in the sheet to leave those photos out of the next copy. The caption under the toggle shows how many of the selected photos it will leave out, the photo count next to the Copy button drops to match, and the completion card reports how many were skipped. Use it after a second pass through the same card to copy only the newly kept photos.
RAW+JPEG pairs
If your folder contains paired RAW+JPEG or RAW+HEIF files, an Include JPEG companions toggle appears. It is on by default, which copies both the RAW and its companion, the right choice for Lightroom and Capture One, which stack pairs on import. Turn it off to copy RAW files only.
XMP sidecars travel with your copy
By default, the .xmp sidecar for each copied photo is copied alongside it to the destination folder. This means your star ratings, color labels, and pick/reject flags arrive in Lightroom or Capture One intact, with no re-importing needed. To turn this off, go to Settings (⌘,) and disable Include XMP sidecars.
Sending ratings to Phocus
If you shoot Hasselblad and finish in Phocus, Palomino can carry your star ratings across. When your copy contains Hasselblad RAW, the Copy to Folder sheet shows a Write Phocus sidecars toggle. The same setting lives in Settings (⌘,) as Include Phocus sidecars, and it is off by default.
With it on, copying a Hasselblad .3fr file also writes a Phocus .phos sidecar next to the copy, so the star rating and color label appear when you open the file in Phocus. Every copied .3fr that is not rejected gets a sidecar, including unrated files. Color labels need Phocus 4.2.1 or later to display. An older version of Phocus keeps the label in the sidecar and displays it once you update. Phocus supports green, yellow, and red labels and treats them as approval status, where green means approved and red means rejected, so a red Palomino label reads as rejected there. Blue and purple labels have no Phocus equivalent and are written without a label. A yellow label looks the same as an untagged photo in Phocus, because yellow is what Phocus shows for any photo without a label. Picks and rejects have no Phocus equivalent and are not written.
Palomino leaves a sidecar alone once Phocus has edited it. A sidecar that still holds only Palomino's own values is updated the next time you copy, so a changed rating or label reaches Phocus.
This applies to 3FR files. A Hasselblad FFF file stores its rating inside the file, and Phocus writes no sidecar for it, so Palomino cannot copy a rating for an FFF without changing your RAW, and it does not do that. When your copy includes a rated FFF, the Copy to Folder sheet shows a note. To avoid this, rate the 3FR files in Palomino before converting them to FFF in Phocus, which carries the rating across into the new FFF.
High-ISO split
Turn on Split high ISO into separate folder to route photos above the ISO threshold into a separate folder, useful for sending a batch to a denoiser without mixing it with your standard copies. The default threshold is ISO 1600. Use the preset chips (800, 1600, 3200, 6400, 12800) or type a custom value. The High ISO folder defaults to a subfolder named "High ISO" inside your main destination, or you can choose a custom location.
Disk space check
Palomino checks available disk space at the destination before copying starts. If the selection may not fit, a warning appears in the Copy to Folder sheet. If there genuinely isn't room, the copy stops as soon as it starts copying with no partial mess left behind. If you copy to another folder on the same internal drive, macOS duplicates the files without using extra space, and the size check accounts for that.
Moving unrated photos to Trash
The Trash unrated photos after copying toggle (red) trashes every photo in the source folder that has no star rating and is not flagged as a Pick. That includes rejected photos that have no stars. The exact count is shown before you confirm. A confirmation alert with the count appears when you click Copy. There is no undo for this action beyond the macOS Trash.
When the source folder is on a camera card, this option is disabled. Files on a card are never changed.
While Palomino is still reading in-camera star ratings from Hasselblad files, the toggle is disabled with the note "Reading in-camera ratings…". This protects photos you rated on the camera from being trashed as unrated before the scan finishes. The toggle re-enables on its own when the scan completes, or click Enable anyway to proceed after a warning.
"Trash unrated photos after copying" affects the source folder, not the copy destination. It trashes every photo with no star rating that is not flagged as a Pick, including rejected photos with no stars. Review the count carefully before confirming.
Drives without a Trash
Some drives have no Trash. Network shares are the usual case: an SMB share or a NAS volume mounted in Finder usually has none, which is why Finder deletes files there immediately. Move and Trash unrated photos after copying both put originals in the Trash, so on a drive without one the copy completes and the originals stay in the source folder. Palomino never deletes a file outright.
When the source folder is on such a drive, the Copy to Folder sheet shows a note next to Move and next to the trash toggle before you start, and the completion card says why the files stayed. To clear a folder on a network share, copy your picks out with Palomino, then delete the rest in Finder.
The sheet remembers your last settings
The Copy to Folder sheet reopens the way you left it. The filter chips, the destination folder, and the high-ISO split keep their last values across copies and across app launches, so a repeat copy to the same folder needs nothing beyond pressing E and clicking Copy.
The one exception is Trash unrated photos after copying, which turns itself off every time the sheet opens. Deleting files stays a deliberate choice each time.
If the remembered folder is unavailable, for example on a disconnected external drive, the copy stops with a message asking you to choose the folder again. Your saved presets are separate and unaffected; when your current settings match a preset, that preset lights up.
Saving copy presets
If you copy the same way each time, save your settings as a named preset and apply them with one click. Set up the Copy to Folder sheet the way you want it, then click Save as preset at the right of the Preset row at the top of the sheet. Palomino asks for a name and saves the current settings under it.
A preset stores your filter choice, destination folder, file-name template, job name, start number, Include JPEG companions setting, the Keep stacks complete setting, high-ISO split and threshold, the Verify copied files setting, the If a file already exists choice, and the XMP and Phocus sidecar options. The Trash unrated photos after copying option is left out on purpose, so applying a preset never turns that delete on.
Saved presets appear as buttons in the Preset row. Click one to apply its settings to the current copy. The button highlights while the sheet still matches that preset, so you can see which one is active. To remove a preset, select it and click Delete in the same row.
If you save a preset with the name of one that already exists, Palomino asks "Replace preset?" before it overwrites the older settings. Click Replace to update the preset, or Cancel to keep both and save under a different name.
Presets are shared across every folder you open, so a preset you save on one shoot is ready on the next.
Managing presets in Settings
To rename, reorder, or repoint a preset, open Settings (⌘,) and select the Presets tab. Each saved preset has a row with a short summary of its filter, destination, and sidecar settings. The buttons in the row let you rename the preset, move it up or down to change the order it appears in the Copy to Folder sheet, choose a new destination folder, or delete it. The Copy to Folder sheet stays the place to save a new preset and to apply one to a copy.
The free copy limit and Palomino Pro
The free version of Palomino allows 50 photo copies per session. A banner in the Copy to Folder sheet shows how many remain. When the limit is reached, restart Palomino to get 50 more, or upgrade to Palomino Pro for unlimited copies, a one-time $29.99 purchase. The photo count next to the Copy button shows how many will actually be copied given the remaining budget.

My copy came up short: fewer photos than I expected. Check whether the free session copy limit was hit (the Copy to Folder sheet shows a banner). Also check whether a capture-day filter was still active: copying follows your active filters, so a day filter limits the copy to that day's photos. Clear the day filter to copy the full shoot. See Viewing and Filtering.